
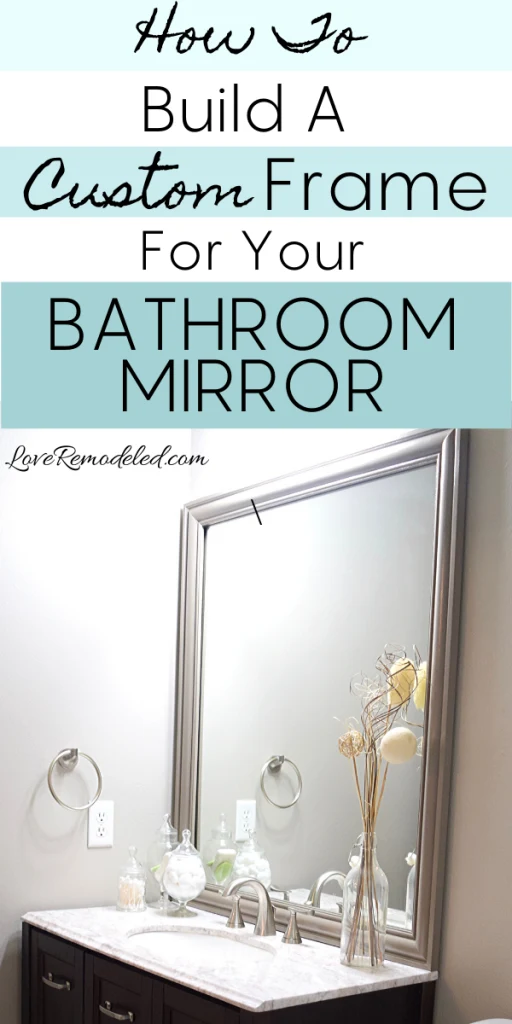
Framing your builder grade mirror is easy and it makes a huge impact!
Putting a frame around a builder grade mirror can really upgrade the look of your bathroom.
When you frame your bathroom mirror, it makes the bathroom look more expensive and gives it a really custom look.
This is a great, easy upgrade to do before you sell your home, or the perfect way to put your unique touch on the style of the bathroom. Plus, this cheap and easy update requires simple tools and little know-how – the perfect DIY for anyone!
Check out these before and after pictures of my bathroom mirror.
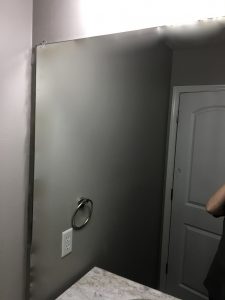
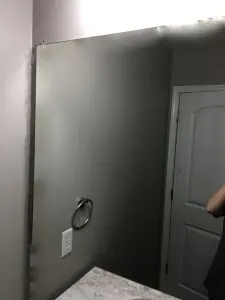
What a difference! Making this frame only took me about 2 hours total. SO fast and easy!
So, here is what you need to frame your builder grade mirror!
This post may contain affiliate links. If you have any questions, please see my disclaimer page.
A lot of these things are items that you may have in your garage. If not, they’re easy enough to pick up, or you can add them right into your Amazon cart and have them delivered in two days.
- A tape measure
- Crown molding, or another style of wood trim that you like
- Sandpaper
- Miter saw or miter box
- Dremel tool
- Paintable caulk
- Painters tape
- Paint
- Poly top coat
- Liquid Nails
Here is how to frame your builder grade mirror!
1. Measure.
Once you have gathered all of your supplies, its time to get to work. Measure the length and width of your mirror.
2. Choose your edge style.
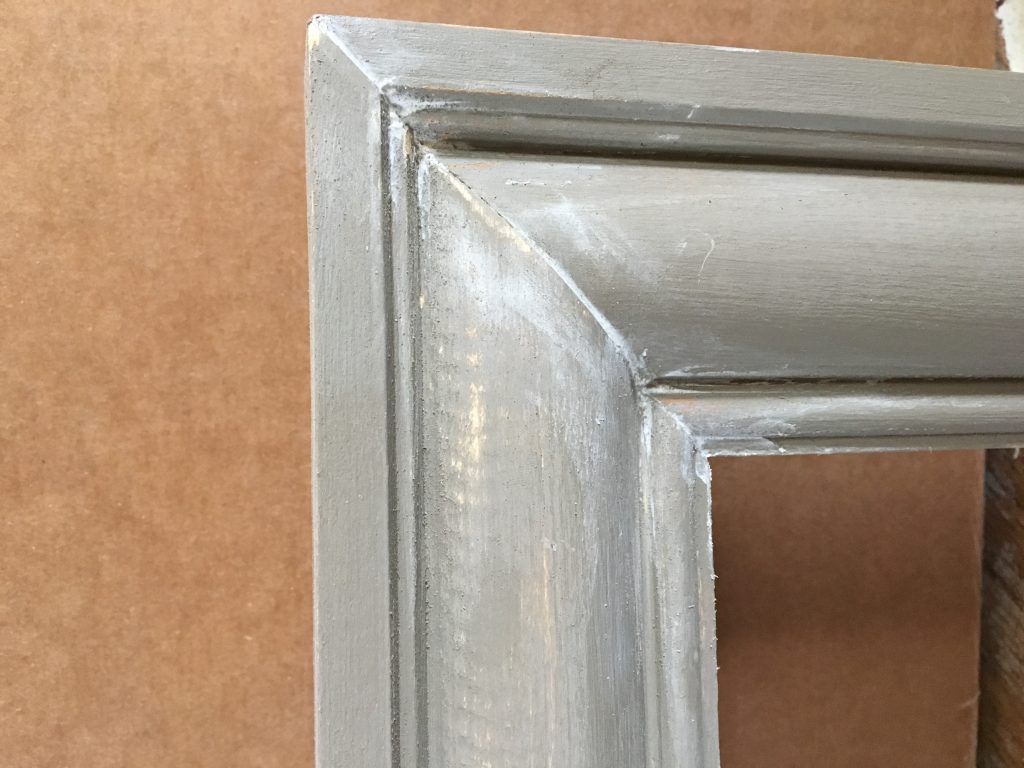
Decide whether you want your frame to be “rustic” looking, and have square sides, or more “finished” and have mitered sides.

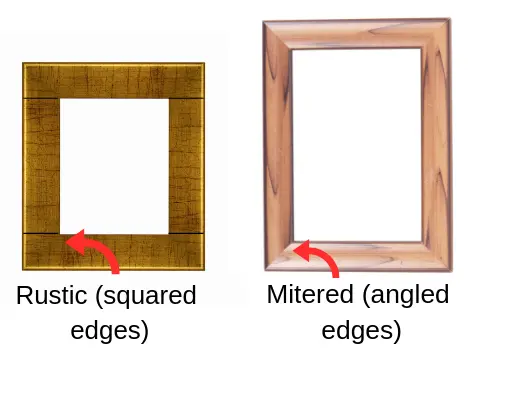
For this tutorial, we will make mitered edges, because I was going for a finished look in my bathroom.
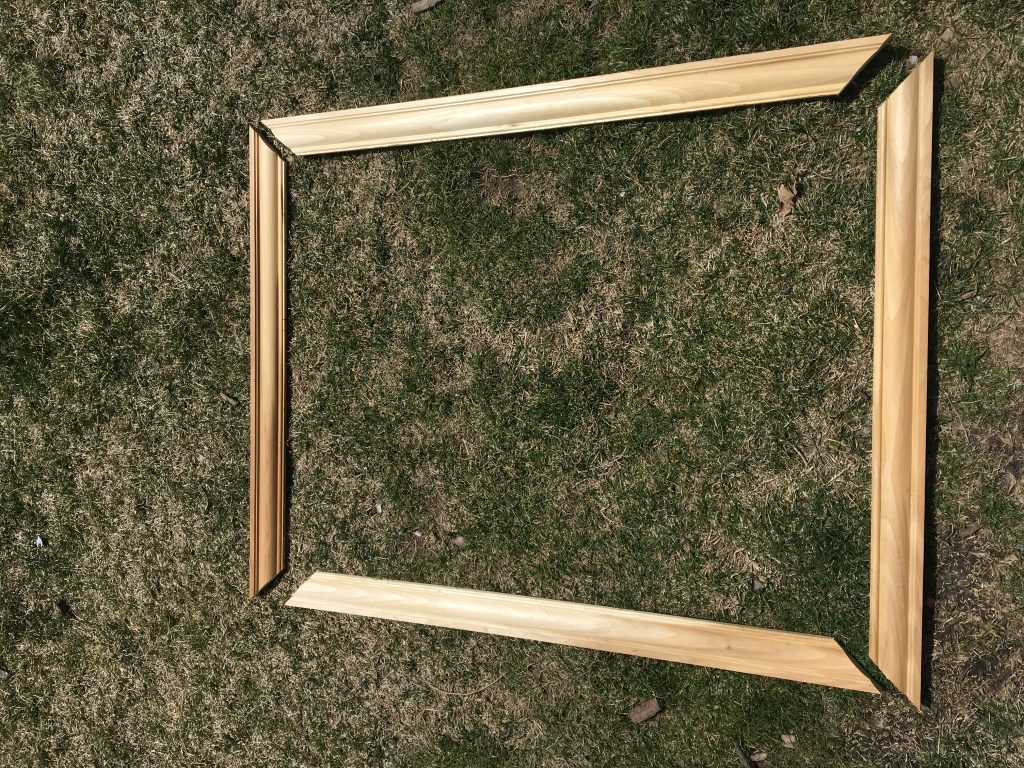
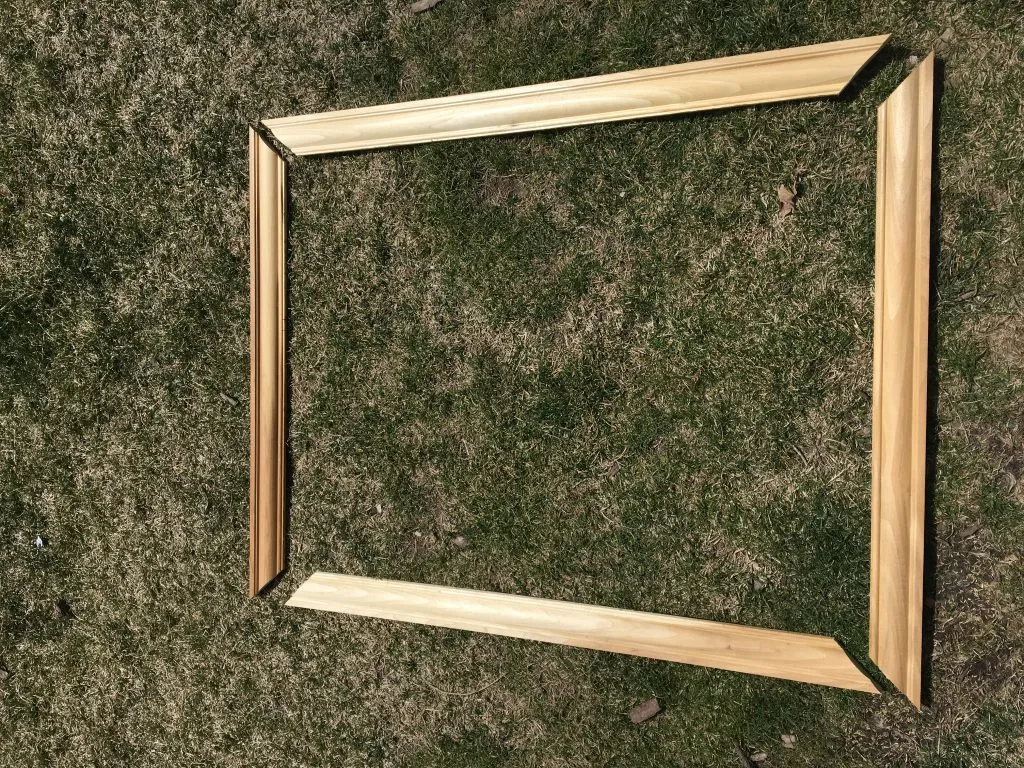
3. Cut.
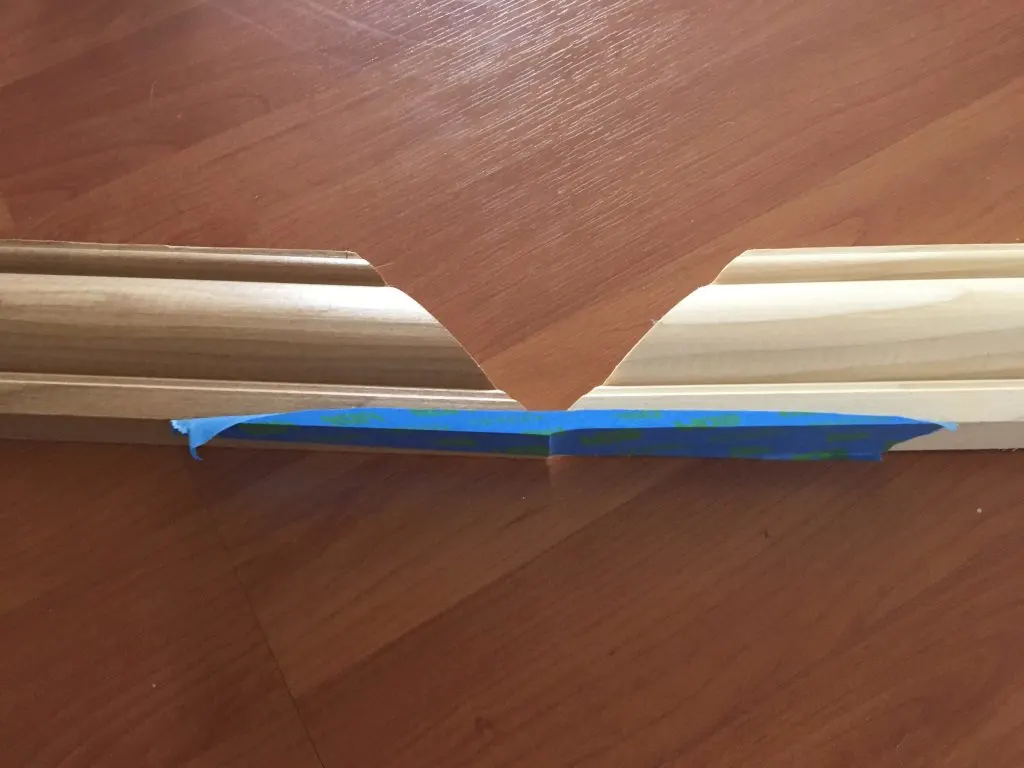
Subtract 1 inch from the lengths and widths of your crown molding, and cut the inside corner of your molding to that length using your miter saw or miter box. Because your cutting on a diagonal (to make a mitered edge), the outside corner of the crown molding will be longer.

So, if your mirror is 30 X 40, place a mark on the inside edge of your crown molding at 29 inches. Cut the piece of a 45 degree angle with either your miter saw or a miter box. This will ensure that your edges are perfect.
Measure the piece you just cut, and cut your next length to be the exact same size as this one. You could also just cut both of them to 29 inches (or whatever is one inch less than your mirror), but I have found that cutting based on my measured and cut piece has given me more success than cutting only based on measurements.
Do the same thing for the length pieces.
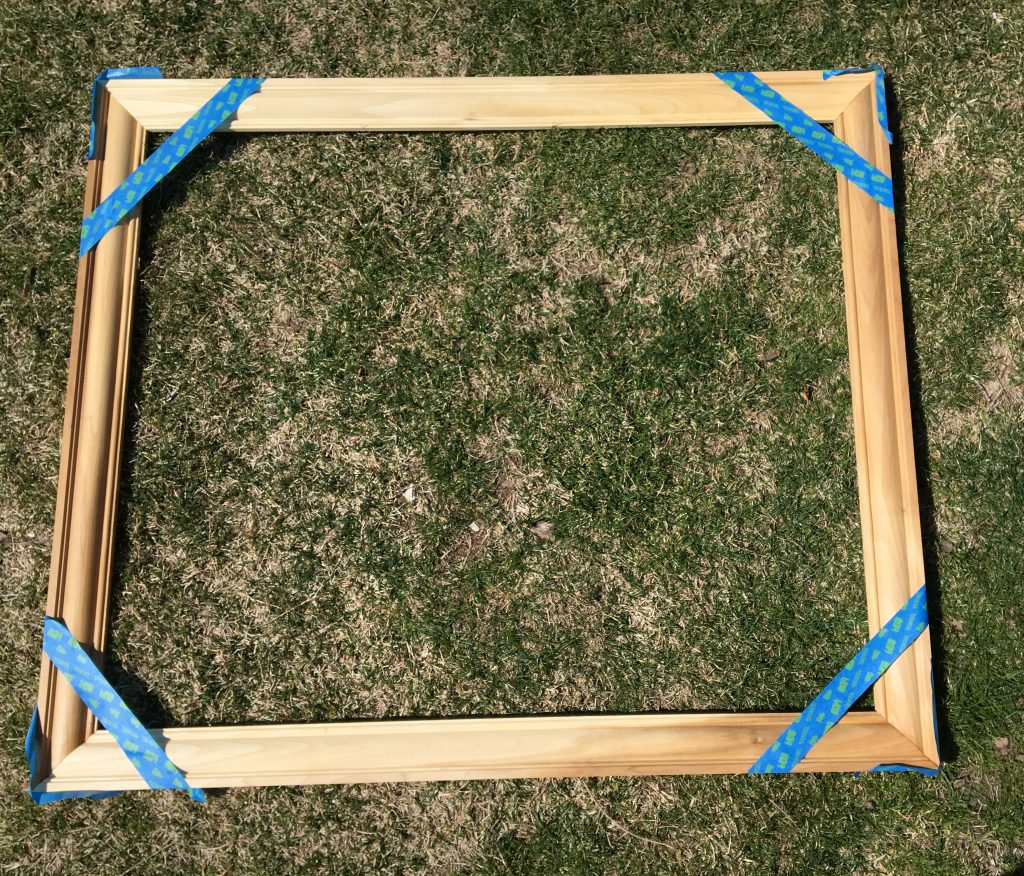
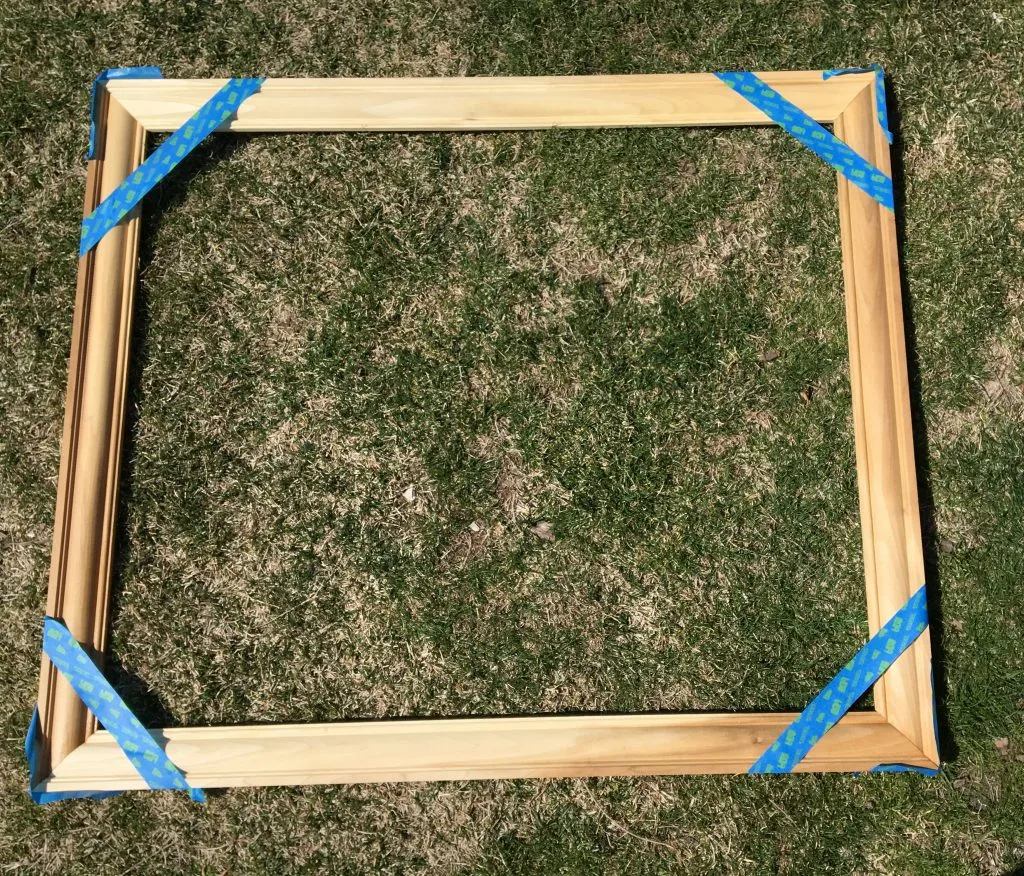
Your wood frame should now look like this.
4. Glue the corners.
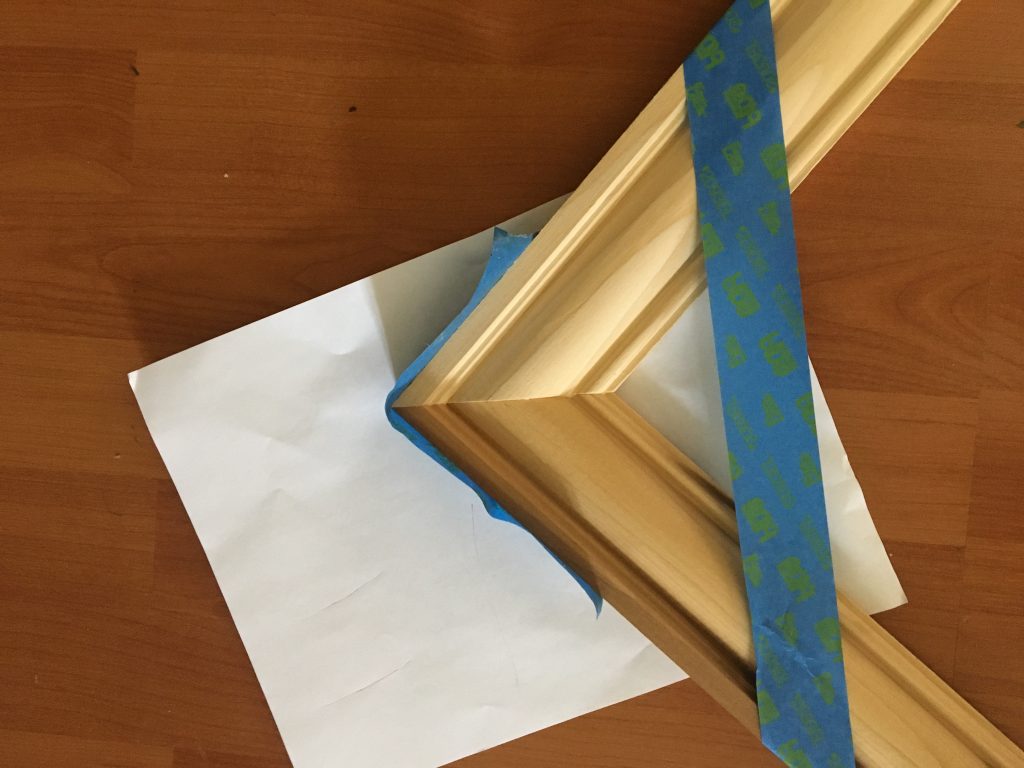
I have a sneaky little glueing trick to show you here. This will help your edges line up perfectly, and will apply some pressure to the seam while it dries.
Take two of your edges and line them up straight so the long tips touch each other. Then, put a piece of painters tape on the edge.
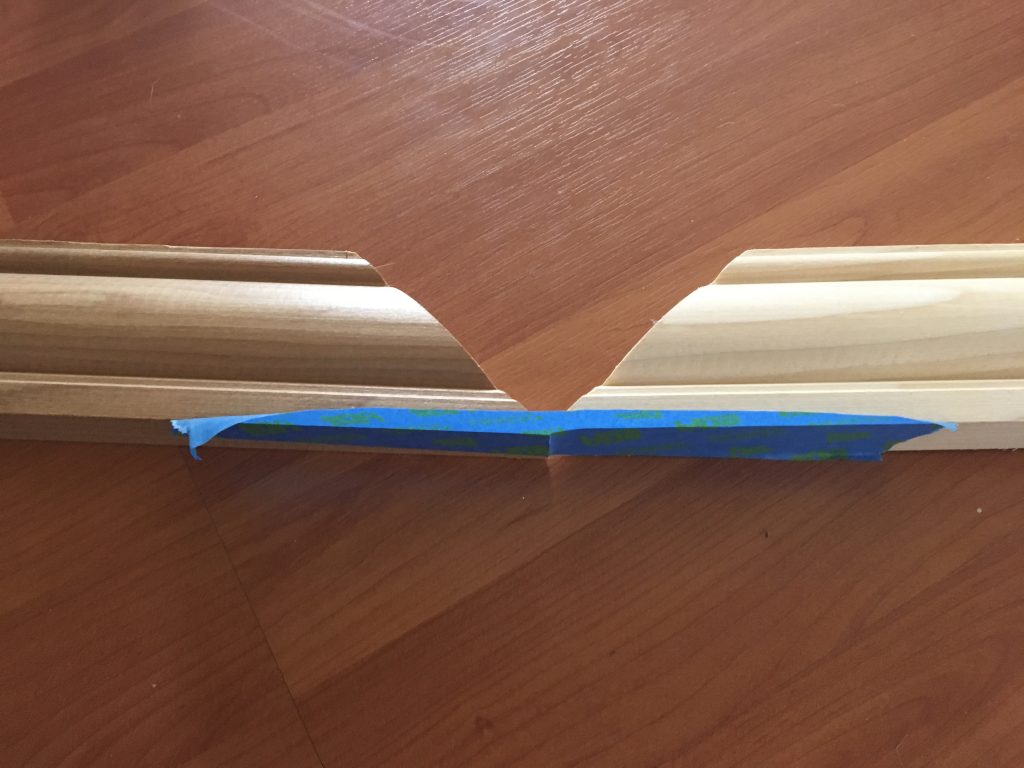
Now that you have done that, put some wood glue along the edge of the cut pieces and bend the pieces together so both of the cut edges line up. They should line up PERFECTLY! Secure the pieces with another piece of tape to apply pressure. (The paper under the edge is just to ensure wood glue didn’t get on my floor, in case you’re wondering!).

Continue to do this until all four sides are glued. Allow the glue to dry based on the manufacturer’s specifications.
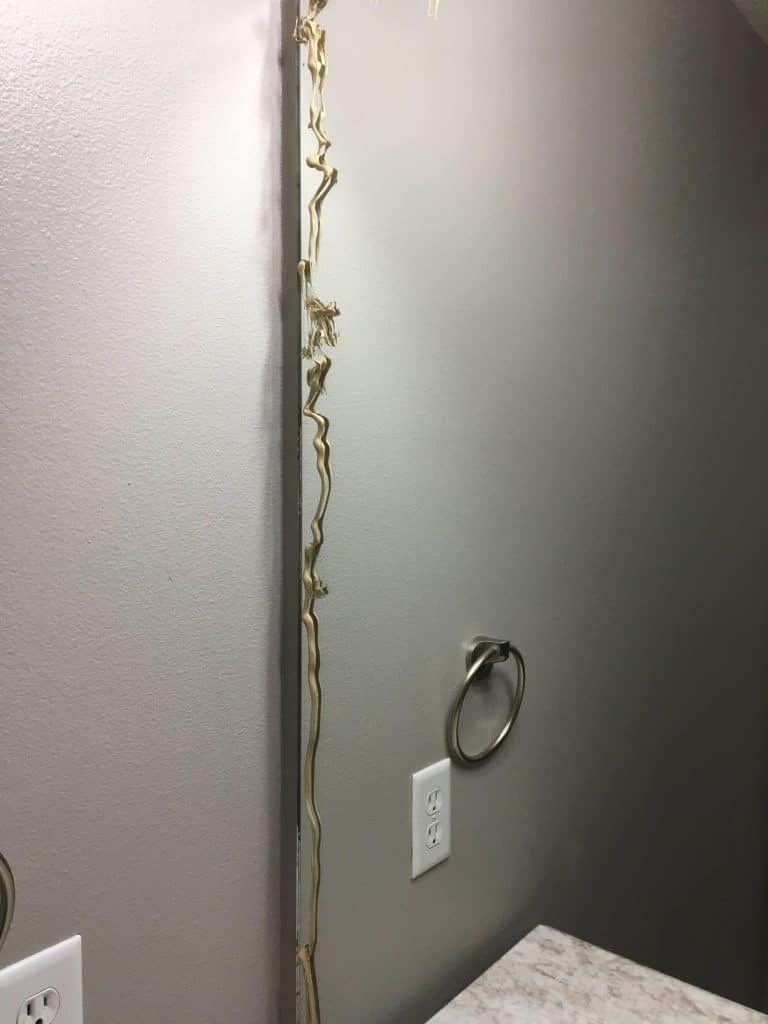
5. Measure where the clips are.
Now that you have the frame built and glued together, take it to your bathroom and put it against your mirror. Fits like a glove, right? Except for those clips!

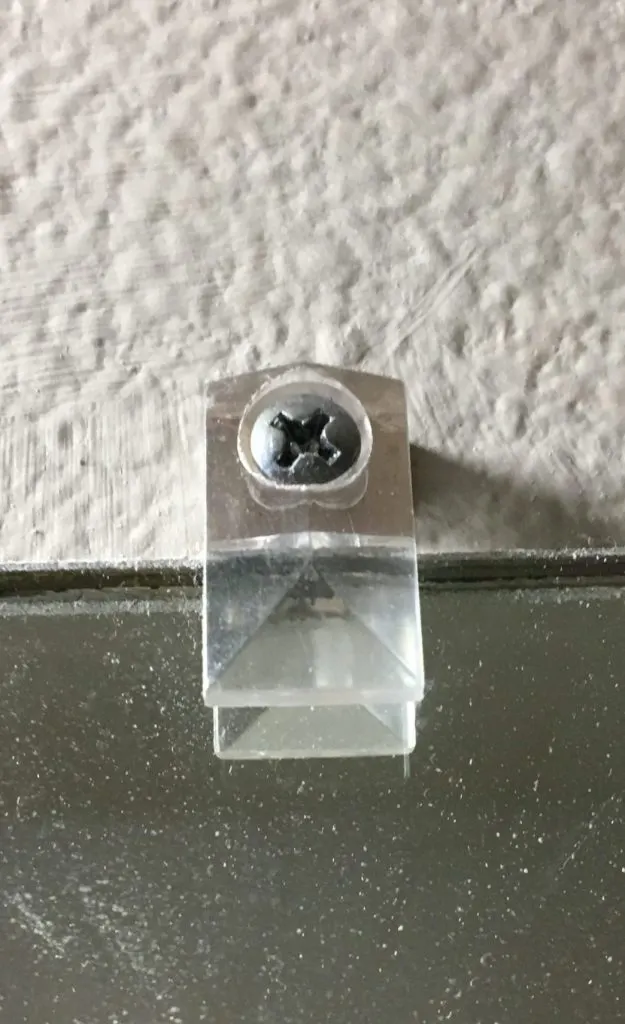
So place a mark on the back of your frame where the clips hit the frame. It doesn’t have to be EXACT, but pretty close. You can try to put chalk on the clip and see if that transfers on to the frame if you like, measure it with a tape measure, or just eyeball it like I did.
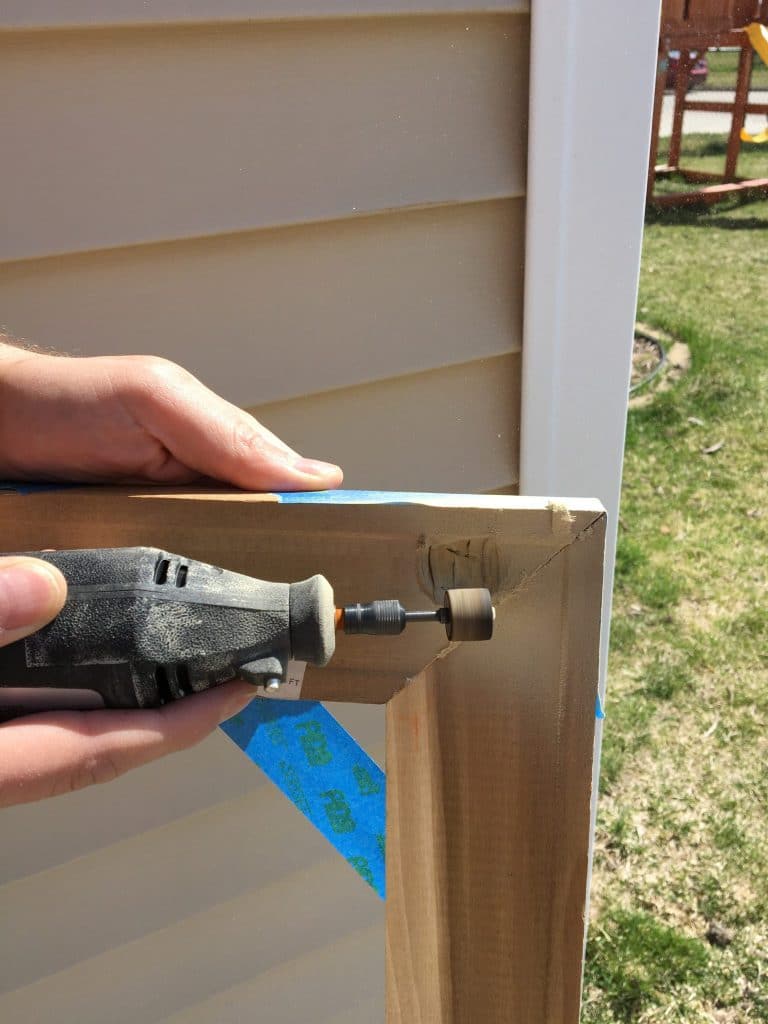
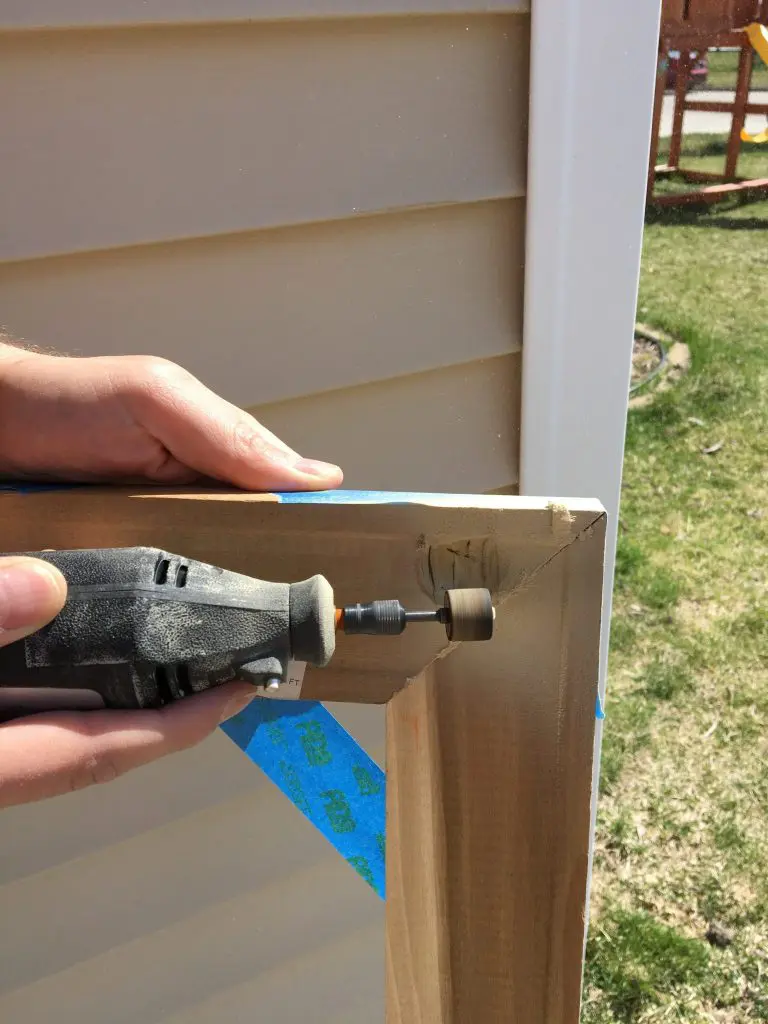
6. Dremel your notches.

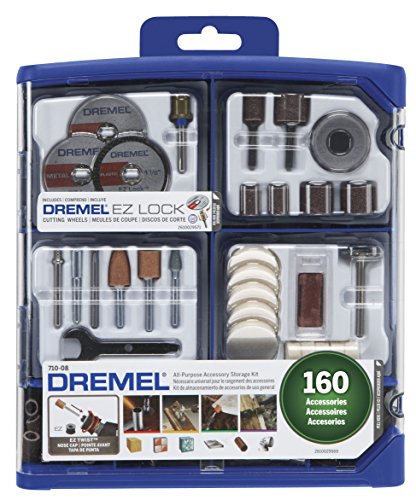
Get your Dremel and a sanding attachment. You’ll likely need more than one sander.
You can buy sanding attachments separately, or you can just order this kit that contains a bunch of different tools and sanders. It a great value, and has a 160 attachments that you’ll use for one project or another.
Sand a notch on the mark that you made in step 5, indicating where the clip meets the frame. This step make take some trial and error to get the notch just right, but just keep sanding until the clip fits snuggly in the notch, without pushing the frame out.
7. If you’re going to paint, caulk your edges.
Use your paintable caulk and run it along the seams. Remove the excess with a wet finger, so that the caulk only sits in the seam. I did this in between coats of paint, but you can do it before as well.

8. Paint or stain.
Your frame is ready to either be painted or stained now! I painted mine with a soft gray, and then finished it with a waterproof top coat.
9. Adhere the frame to your mirror.
Take your Liquid Nails and make a line along the edge of the mirror. Make sure that it will be covered by the frame (so only put Liquid Nails on the last inch of the mirror).
Now, put the frame onto the Liquid Nails.
You have to hold it in place until the Liquid Nails sets. In my case, the frame sat right on top of the vanity, meaning I didn’t have to hold it THAT long.
If your mirror frame is going to be suspended in air, you may need to find a faster curing adhesive, or put finish nails through the outside edges of the frame and into the wall.
As another option, you can use several pieces of painters’ tape to hold it in place while the glue dries.
Luckily, your frame should be pretty light!
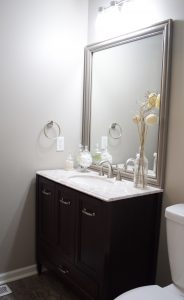
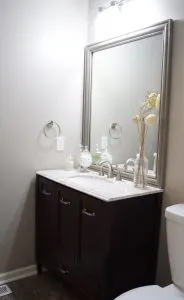
Here is how my frame turned out! I love how it adds a bit of style to the bathroom


Looking for other DIY bathroom upgrade ideas?
Check out this list of easy bathroom DIYs – with links to tutorials!
Remember to pin this post for later!

Andrea
Wednesday 7th of April 2021
The caulking didn't work for us. We decided to stain instead of paint and the caulking doesn't stain. We had to redo the whole thing. Otherwise everything else worked out really well.
Lauren
Friday 9th of April 2021
Oh no! Yes, you can't stain caulk. So sorry that you had to redo it all - what a pain! Glad you got it done in the end :)
Shirley
Wednesday 13th of January 2021
This was fun to see tonight, as I did this myself some time ago. And it really works great! I have the clips on the mirror too, so was anxious to see what you did. Actually, my husband came up with the idea and did it for me like you did. The hardest part of doing this project was getting it marked in the exact spots. But I too didn't worry to much because we could just make the hole a little wider. Thanks for sharing this and giving these good ideas so others will know exactly what to do. I was so pleased with mine.
Lauren
Sunday 17th of January 2021
Hi Shirley! How fun! I'll bet your husband is a pretty handy guy! :) Marking the spots can be tricky. I like using tape to transfer the marking from one spot to another. But your right, you can just make the hole bigger if it doesn't work quite right. Thanks for commenting!
Deabs
Thursday 24th of December 2020
Love this and we are finally making the plunge to do this. How do the exposed edges look with the frame on top of the mirror? My husband keeps wanting it to “wrap” the edge of the mirror with the wood.
Lauren
Sunday 27th of December 2020
Thank you! I never noticed the edges behind the frame. They tend to be so thin (typically 1/4 inch), so unless you are standing directly beside the mirror (which I couldn't because there is a toilet there), you can't see it. Plus, I made the frame slightly wider than the mirror, so you didn't really see it at all. It is similar to how a picture frame hangs on a wall - even if it is not entirely flat against the whole wall, you don't notice. Hope you guys love this project!
Tom
Saturday 17th of October 2020
Any suggestions on the oval beveled type?
Lauren
Monday 19th of October 2020
Hey Tom! I would try making using 8 shorter boards, cutting them on a mitred edge, and making a frame that way. You could glue the whole thing together or onto the mirror itself. I’m thinking kinda like an elongated stop sign edge, if that makes any sense. You may need wider boards to cover the curves of the oval, but it could look pretty cool! Good luck!
Ginny
Tuesday 16th of June 2020
I want to do this to the mirror in one of our bathrooms, but wonder how I will ever get the mirror down again if I wanted to replace. Any suggestions or do we just cross that bridge when we come to it?
Lauren
Wednesday 17th of June 2020
Hi Ginny! I haven't found that Liquid Nails is quite as strong as it claims to be. Since a mirror is a shiny surface, my guess is that you could pop the frame off with a small crowbar. As an alternative, I'd bet that you could stick the frame on with velcro 3M tape. Then you could just take the frame off and unscrew the clips that hold it on. Good luck Ginny!