How To Make Sauerkraut
Perhaps you have seen raw sauerkraut in the refrigerated aisle of your grocery store and wondered, “Who is buying rotten cabbage for $6 for a jar?” Or maybe you never heard of it all, but I wanted to share a bit of a background and give you a simple recipe to make your own delicious, healthy, and ancient homemade sauerkraut.
What is it?
Sauerkraut is an old recipe for preserving cabbage before the advent of refrigeration using fermentation. Healthy bacteria (like the kind in yogurt) convert the natural sugars in the vegetables to lactic acid, which in preserves the sauerkraut and gives it its distinctive sour taste. Many people extol the health benefits of fermented vegetables, and especially sauerkraut. If that’s something that interests you, you find a endless articles online about it. I am personally persuaded that there are indeed healthy benefits to eating probiotic-rich food, but I’m not an expert.
How is it different than store-bought?
As the pasteurization and canning became the norm for grocery stores, fermented foods went by the way side, and are only coming back into favor recently. The authentic sour taste was replaced by vinegar by the big grocery suppliers. This bagged and canned variety are not full of probiotics and are a industrialized knock-off to the original food itself. Just like homemade bread, the difference is night and day. That being said, you can now find raw sauerkraut available in the refrigerated section for a princely sum of $6-8 dollars a jar. I’ve not tried it but think it is probably pretty good.
How does it taste?
Its awesome if you like sauerkraut. I do not like sour tasting things as a general rule, but I enjoy this much better than store-bought sauerkraut. My husband, on the other hand, loves it, and smothers it with mustard, cold (to keep the good probiotics alive) on hot dogs, sandwiches, and as a great compliment to pork dishes.
How do I make it?
You can find plenty of youtube videos on the process, and I’d recommend you watching a couple.
This post may contain affiliate links. If you have any questions, please see my disclaimer page.
Containers:
The cabbage will have to sit for a few weeks in a food-safe container. As it ferments it will give off carbon dioxide, which your container will have to be able to vent. The ideal container for the job is a fermentation crock, that you can buy online.
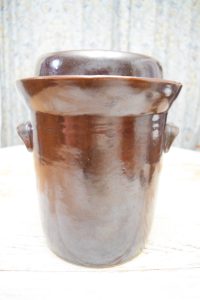

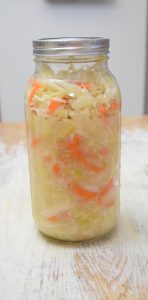
You should buy a fermentation crock if you think you are serious about making sauerkraut and other fermented veggies on a regular basis. If you’re not “there” yet, but want to experiment, you could ferment the cabbage in glass ball jars. Caution: If you use the ball jars, you can fasten a clean cheese cloth with a rubber band over the opening. Another idea is to find self-venting lids online. I plan on on purchasing these ball jar vent lids for smaller batches of fermented veggies.
Ingredients:
1 Cabbage
1.5 Tablespoons of Non-Iodized Salt (such as pickling salt, sea salt or Himalayan salt)
Optional: Add carrots, radishes, jalapenos, garlic, and many, many other vegetables
Directions:
1. Buy a fresh cabbage. Rinse it and discard the outer leaves. Quarter the cabbages, and remove the core.
2. Slice the cabbage quarters into very thin ribbons.
3. Place the cabbage in a large mixing bowl and mix in the salt (use your hands for this). You will notice liquid will begin to collect in the bowl. This is good.
4. Take a handful of the cabbage leaves and firmly push them down into your well-cleaned fermenting container. After each layer is added, I like to use my knuckles to smoosh it down. This releases more liquid from the cabbage into the jar.
5. Once the jar is filled, ensure there is a layer of liquid covering the vegetables. Use a spare cabbage leaf to cover the top of the sauerkraut and use a weight to submerge all of this in the liquid. The liquid is what preserves the cabbage from mold in the air. If you are using a crock, you will have a ceramic weight to rest on top and keep the veggies submerged.


If you are using a jar, you may need to improvise. One method is to fill a ziplock bag with water and let this rest on top. They also sell these fermenting weights to do the job.
6. Cover the container. A crock will have a lid with a water lock that you will pour some salt water around the edge to seal it. A mason jar lid should be covered with the cheesecloth and a rubber band or you can use a venting lid.
7. Let it sit – how long depends completely on your taste preference. A fresh and more crisp sauerkraut can be enjoyed after a week. We typically let ours sit for 4-6 weeks.
8. Enjoy and refrigerate any leftovers. After it ferments to taste, we transfer it to Ball jars and refrigerate it. It will keep for quite a while this way.

If you really just don’t like sauerkraut, but you are interested in the health benefits or preservation method of fermented vegetables, you can find countless recipes online for fermenting a host of different kinds of veggies. Additionally, there are a many fermented beverages out there that contain probiotics – Kefir, Kombuchu, etc.
Wondering where to get a crock?
Here is a link to the crock we use. We love it, and also use it to make pickles.
If you’re not ready to buy a crock, here are pickling lids for mason jars.
Also, in case you want more information on the fermentation process or on other things that you can ferment, here is book by the fermentation guru!
Our next step…
We plan to use our homemade sauerkraut to make homemade pierogies! If anyone has a recipe, please share it below!